Portfolio
By Jonathan Berry
First 2D Animation With Sound
On the right hand side is my 2D Animation that i have created whilst in college for one of my teachers called "Chris Kuta"
2D Animation Video File Applying The Sound
On the right hand side is me adding, placing the different sounds in along with the video, i created the "Animation" in "Adobe After Effects" and used "Adobe Premier" to add the video and sound.
First Person Shooter (FPS) Poster
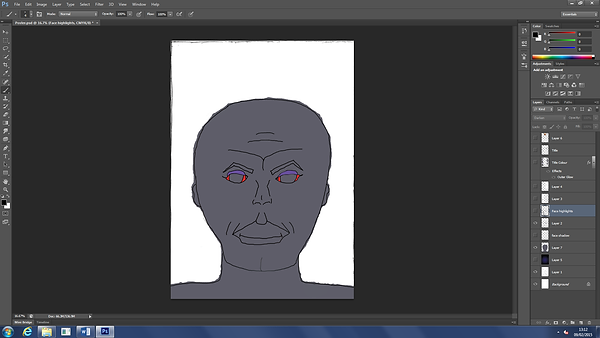
On the right hand side is my (FPS) game poster, on the poster is the old man that i created in "Adobe Photoshop" the game is based around him along with the title of the game placed upon him. This was originally drawn and scanned in then worked upon. All my (FPS) work here was created for "Chris Kuta" and is now being used for "Max Ibrahim" for Unit 72 - Games Design.

First Person Shooter (FPS) Heads Up Display (HUD)
On the right hand side is my (FPS) (HUD) which i created on "Adobe Photoshop" but originally drew the ideas in a sketch book then scanned in, then worked upon. The backgrounds are not my backgrounds but i used them to give an e.g. of what my (HUD) would look like in a gaming environment.


First Person Shooter (FPS) Game Cover
On the right hand side is my (FPS) Game Cover that i created in "Adobe Photoshop" but was originally scanned in from a sketched up idea then worked upon, i used the idea from my poster for the front cover then i created the the back cover of the inside of a factory where it all begins.
First Time Illustrator
On the right hand side is a piece of work for a ghost character using the software "Adobe Illustrator" i was not requested to use this software, but i am aware we will be using this software in the future so i had a mess around with it and this was the character i finished with on short time that i had to do it.
Creating Leather Texture Adobe Photoshop
On the right hand side is a piece of work for my first time at creating a leather texture for e.g. "Dante's Jacket" that i created using the software "Adobe Photoshop"
Adding The Leather Texture
On the right hand side is where i have applied the leather texture that i have created to a "Dante" model that i have downloaded using "Adobe Photoshop"
Maya Work
Below are a few examples of work that i have created using the software known as "Maya".
R2D2
On the right hand side, is a R2D2 that i created on "Maya" for a piece of my work which was requested by Max Ibrahim.
R2D2
On the right hand side, is a R2D2 that has been rendered with lighting.
Sandcrawler
On the right hand side, is a Sandcrawler that i created on "Maya" for a piece of my work which was requested by Max Ibrahim.
Sandcrawler
On the right hand side, is a Sandcrawler that has been rendered with lighting.
Luke Skywalkers House
On the right hand side, is Luke Skywalkers House that i created on "Maya" for a piece of my work which was requested by Max Ibrahim.
Luke Skywalkers House
On the right hand side, is Luke Skywalkers House that has been rendered with lighting.
Lightsaber
On the right hand side, is a Lightsaber that i created on "Maya" for a piece of my work which was requested by Max Ibrahim.
Lightsaber
On the right hand side, is a Lightsaber that has been rendered with the Glow Effect.
Giraffe
On the right hand side, is a Giraffe that i created on "Maya" for a piece of my work which was requested by Max Ibrahim.
Giraffe
On the right hand side, is a Giraffe that has been rendered with lighting.
Giraffe
On the right hand side, is a Giraffe that i have highlighted then used the number 3 button on the keyboard to change it look more like a monsterous Giraffe.
Photoshop Work Of Models
On the right hand side, is some of the models i have created and put into "Photoshop" with a background to try and give it a realistic feeling.


Drawings/Sketches/Photoshop
Here are different Drawings/Sketches/Photoshop pieces of work that i have rather done for myself or done because its been requested by one of my teachers.
Dragon
Here is a picture of a dragon that i created myself using pen, it took me four hours to draw it, i then went over it with pencil and used my finger to finger shade it, the reason i did it in pen first is because im a perfectionist, so i wanted to see if i could get it right the first time without rubbing anything out.

Army Team
On the right hand side is different characters i have created for my teachers "Chris Kuta" and "Max Ibrahim" for my FPS (First Person Shooter) Game.
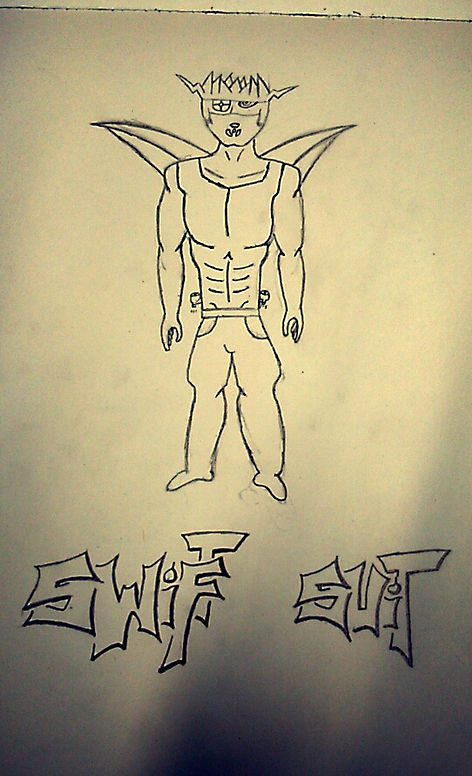
Jump Suit
Here are the stats of this character within my game.
You will have a character in a jump suit that allows extra jump by 25% and sharpened shooting allowing a 10% faster time on aiming down the sight than other characters.

Swift Suit
Here are the stats of this character within my game.
You will have a character in a swift suit with jets built into the suit allowing the character to move at a 25% faster speed than other characters, shoot faster and climb obstacles faster, take more damage than other characters.
Mechanical Suit
Here are the stats of this character within my game.
You will have a character in a mechanical suit, this suit allows the user to take less damage, move slower than other characters and do more damage than other characters.

Demonic Demon/Spirit Team
On the right hand side is different characters i have created for my teachers "Chris Kuta" and "Max Ibrahim" for my FPS (First Person Shooter) Game.
Destructor
Here are the stats of this character within my game.
You can choose to be a destructor which this character will have the main perk of being able to possess an enemy and use their enemy against the enemies own team mates, this character can also grab a hold of objects and chuck objects at their enemy, another perk of this character is that they can grapple their enemy from a fair distance to possess them, once the possessed host is killed this character can jump to the next enemies body.

Life Sucker
Here are the stats of this character within my game.
You can choose to be a life sucker that is a ghoul that can fly through walls, move at 50% faster than other characters and can only attack when within melee range, so they grab their enemy and pull them through the floor then suck the life out of their enemy.
Risen Old Vanquished Soldier
Here are the stats of this character within my game.
You can choose to be a risen old vanquished soldier that is capable of smashing through walls, not being able to jump, can take loads of damage before death, main weapon being a giant sword and can rip people apart if within melee range with his fists.
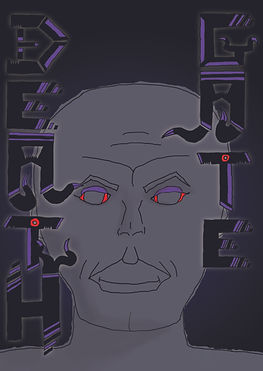
First Person Shooter (FPS) Death Gate Poster
Here is my poster that i created in "Adobe Photoshop" which i will explain on how i created it.


Here i drew up the main character of my game which is the old man in my sketch book, once i done that, i scanned it into the computer and then opened it up in "Adobe Photoshop".
Here i drew over my outline with the colour black using the brush tool, i then selected the colour purple and red for the eyes and eye lids.


I download a colour pallete from the internet of different skin tones, i then upload that onto "Adobe Photoshop", i then select three colours from that and brush them next to each other at the top right hand side of the piece of work to help me work with my design.
I then select the middle colour for the skin and paint it over my character using the "Brush Tool".
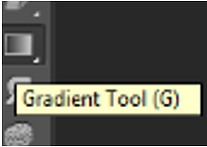
I then use the "Gradient Tool" and select the colours black and purple for a background for my "Poster".
I then use the "Brush Tool", select the colour black and set the flow to 25% down from 100% to give it the shading that you can see on the picture on the right hand side.


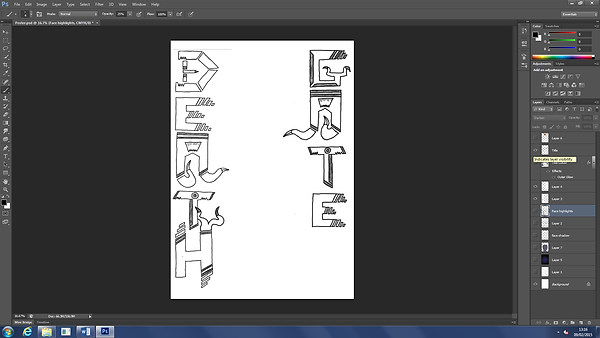
Death Gate Title Text
Here i will be saying how i created the text which goes over what i have done above.
I started by hiding the rest of the work that i have just explained above, i then open my "Death Gate" text that i created in a sketchbook, then scanned into a computer then put onto "Adobe Photoshop" so that i could work with it.

Here i have gone over the lines using the "Brush Tool" with the colour black.
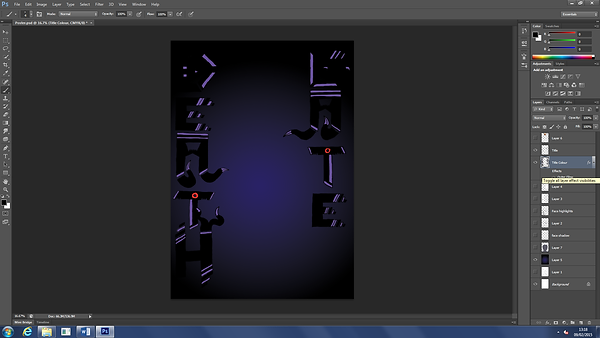
Here i have used the "Brush Tool" and different colours to colour in each part of the text, i added a little extra to the letter "D" as it looked too boring compared to the rest, I then un-hidden the background but i noticed the text blended in with the background too much
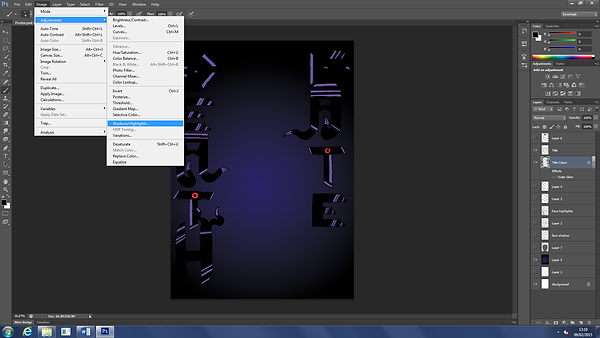
Here to make the text stand out from the background i select the text background and go on (Image > Adjustments > Shadows/Highlights).
Here i set the amount to 35% to give it an outline to the text as you can see on the right hand side.
Here is when i have un-hidden everything so you can see my final project of my "Poster" for my game.
Here shows the different tools that i mainly used, I used the "Brush Tool" to paint on my work, I used the "Gradient Tool" for my background" and i used the "Set Foreground Colour" to change my colours.